20 Things You Should Know How To Do By Your 20s
Get your life together by knowing these things you should know how to do by your 20s
Do you constantly feel like you’re behind with this whole adulting thing?
There’s a lot you should know how to do by your 20s. But what exactly should you know how to do by now?
It’s not like anyone teaches you these things in school!
In this blog post, we will be discussing 20 things you should know how to do by your 20s.
This list is in no particular order because all of these things you need to know how to do by your 20s are equally important!

*This post may contain affiliate links. Purchasing a product or service through an affiliate will earn me a small commission at no additional cost to you. Please read our Disclaimer Policy for more information about the use of affiliate links on this site.
1. Fill out medical paperwork
Remember the days where you would just sit and play on your Nintendo DS while your mom or dad filled out your medical questionnaire?
Ah… the good old days!
But now, being an adult, it is your turn to fill out your own medical forms and be your own medical advocate.
*cue scary music*
Medical paperwork can be overwhelming. I mean what even is insurance? Who is your primary care doctor? And what was that medicine dosage again?!
I would highly suggest having all the common medical information asked for on a patient questionnaire already written down in a Word Document or Google Doc that you can easily access on your phone.
The information you should have written down and have easy access to include, but are not limited to:
- Your full name
- Birthday
- Current address
- Primary care doctor name, location, and phone number
- Preferred pharmacy location and phone number
- Current medications and dosage for each medication
- Family history of medical conditions
- List of surgeries, medical procedures, or injuries you’ve experienced with approximate dates
Having this information written down and easily accessible will save you so much time and energy!
If you feel like your medical information needs a little extra security, you can add a passcode to it.
Microsoft Word will let you set a password for your document, but Google Docs will not let you set a password.
And unfortunately, the password add-ons for Google Docs do not have good ratings, so I would not use Google Docs to store your private medical information if security is a top priority for you.
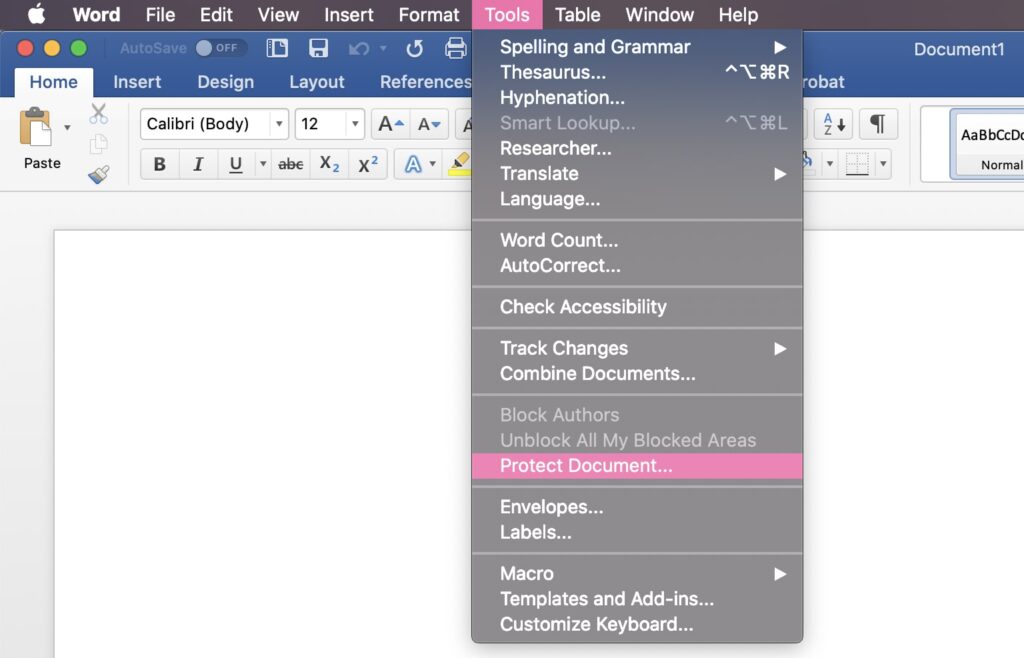
To add a password to your medical information in a Microsoft Word Document:
Tools > Protect Document…
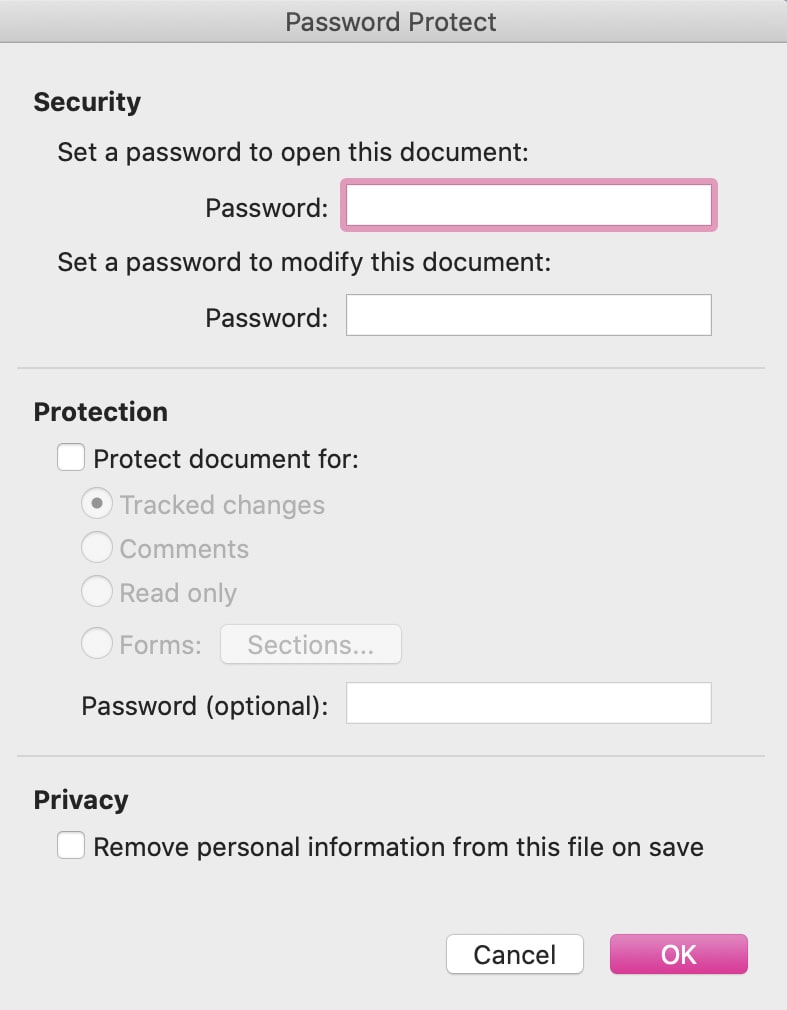
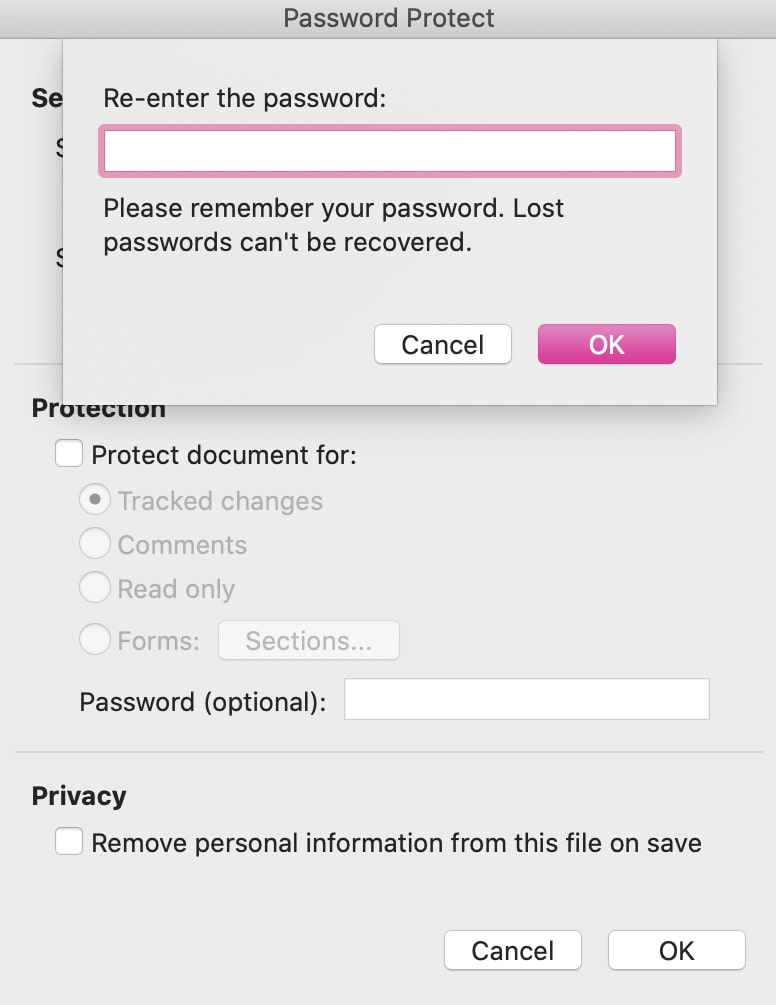
*Microsoft Word will allow you to set a password to enable the document to be opened and/or modified. Make sure you create a password you will remember because you cannot recover your password if you forget it!
Alternatives to Microsoft Word or Google Docs that allow password protection include:
- Dashlane has a Secure Note feature that allows you to password-protect notes you add in the Secure Note Vault–learn more by clicking here.
- Evernote allows you to add a password to a specific selection of text–learn more by clicking here.
- Microsoft OneNote allows you to password protect a section of a notebook–learn more by clicking here.
2. How to create a budget
Budgeting is such an important tool for financial security and success.
Without a budget and tracking your expenses, how will you know exactly where your money is going?
I have already created a tutorial to help you create your own budget and how to create an expense tracker in Microsoft Excel or Google Sheets, which you can check out by clicking here, but I’ll give you a rundown on budgeting 101.
What is a budget?
A budget is a plan you create that specifies how you will spend or allocate your money.
It is somewhat of a fluid plan, meaning sometimes your budget doesn’t always go to plan if you overspend or underspend or some event occurs that you were not expecting.
Regardless, a budget gives you a good starting point of how you will manage your money for a certain amount of time.
How often should you budget your money for?
You can create a monthly budget or a budget per paycheck.
I personally prefer to create a budget per paycheck (bi-weekly budget) because it is easier for my brain to think of things in two-week increments.
How do I create my budget?
You create your budget based on how much money you make in a month (after taxes) and you divide that money up between your regular monthly expenses like rent, food, gas, electricity, insurance, retirement, etc. and non-regular expenses like buying new clothes or getting your nails done.
If you are budgeting by paycheck, I always divide the cost of my monthly expenses by 2 since I usually get 2 paychecks per month.
For example, if the monthly rent of your apartment is $1000, you would allocate $500 from each paycheck in your bi-weekly budget.
Let’s do an example…
Let’s say your monthly income after taxes is $1500.
Monthly income: $1500
- Rent: $600
- Utilities: $150
- Phone: $60
- Insurance: $100
- Food: $300
- Non-regular expenses: $290
This example of a (very rough) monthly budget can help give you an idea of where you will be spending your money for the next month.
Making budgeting a habit in your 20s can help you avoid overdraft fees, you can tackle your debt with more confidence, and you’ll feel more in control of your finances.
What do I do after I create a budget?
Not only do you need to create a budget, but you also need to make sure you are sticking to your budget as you go throughout the month or until you get your next paycheck.
That is where an expense tracker comes into play.
An expense tracker is a way to track the money that you are spending in a given month or whatever time period you prefer.
You can create an expense tracker on paper or use software, like Microsoft Excel or Google Sheets, to help you keep track of your expenses.
Each time you spend money, whether that be a one-time purchase or monthly expense, you record it in your expense tracker.
Having an expense tracker will help you be sure that your checking account is not at risk for overdraft fees and that you are not going over your budget.
Again, I have a whole tutorial on how to create your own expense tracker in Microsoft Excel or Google Sheets which you can check out by clicking here. I even have a video tutorial too that you can watch if you click right here.
3. How to pay your bills or transfer money between bank accounts
As an adult, paying your bills is so important!
You don’t want to accumulate a bunch of interest on your credit cards or have to pay late fees either.
Having to pay interest or pay late fees is money that could have gone towards an emergency fund or a future vacation!
If you do not know how to pay your bills or transfer money between your bank accounts, I highly suggest looking up a tutorial or calling the customer service of your banking institution.
Here are some tutorials for how to pay your credit card bill or transfer money between accounts for some popular bank institutions:
- Bank of America (pay credit card | transfer money)
- Chase (pay credit card | transfer money)
- Citi Bank (pay credit card | transfer money)
- Discover Bank (pay credit card | transfer money)
- Suntrust (pay credit card | transfer money)
- Wells Fargo (pay credit card | transfer money)
4. Make your own coffee at home
One of the most unfortunate parts about the adulting world is that getting a to-go coffee at Starbucks or Dunkin’ Donuts is not cost-effective at all!
While a $3 coffee every one in a while isn’t bad, getting one everyday is not the most financially savvy move if you are trying to save money or pay off debt.
If you were to buy a $3 coffee every single day for a year it would be $1,095.
That money could definitely be allocated to something a lot more fun or delicious than coffee–like tacos!
If you haven’t started making or learning how to make your own coffee at home, I advise you to go ahead and invest some money in a good coffee machine, some coffee beans (or pods), and a few cute mugs to help motivate you in to get up in the morning.
The cheapest way to make hot coffee in the morning is to purchase a coffee machine that brews coffee grounds rather than a Keurig or Nespresso machine since the pods/capsules are more expensive in the long run to purchase than coffee grounds.
But a Keurig or Nespresso machine is still more cost-effective in the long run than buying a to-go coffee every day!
For example, if you drank one cup of coffee using the Nantucket Blend of Green Mountain Coffee, which is about 42 cent a k-cup pod, that is about $153.30 a year.
Alternatively, if you drank one cup of coffee using a Carmel Cookie capsule, which is about $1.10 per capsule, that is about $401.50 a year.
However, if you want to go the regular coffee machine route here’s how you can go about it:
A great, cost-effective coffee maker is the Mr. Coffee 12-cup Coffee Maker.
You’ll also need coffee filters, which are super cheap at your local grocery store or you can get a pack of 500 from Amazon for under $13.
My boyfriend and I personally started out with the Mr. Coffee coffee machine when we moved into our first apartment together, but we soon bought a Keurig due to its convenience.
If you enjoy coffee creamer, I have seen Coffee-Mate creamers on sale at Target– $9 for 3 of them, and the sugar-free versions are only 15 calories per tablespoon, which is great if you are trying to lose weight!
Currently, I love combining the hazelnut sugar-free creamer from Coffee Mate and the sugar-free Torani hazelnut syrup (0 calories and 0 sugar!) in my morning cup of coffee.
However, if you’re health-conscious, just a heads-up that the sugar-free Coffee-Mate creamers are not the healthiest coffee creamer options.
If you are looking for a coffee creamer that has more natural ingredients check out this YouTube video on coffee creamers at the grocery store from Flav City by Bobby Parrish. That video is super informative and shocking!
To stretch your dollar even further, after making coffee from your coffee machine, if you have any coffee left in the pot, you can always store the pot in the fridge and have iced coffee ready to go the next day.
5. Able to cook simple meals at home
Going out to eat or ordering Uber Eats is a great way to get a quick meal if you have a busy schedule or just want to treat yourself on a Friday evening after work.
However, if you want to save money and be extra-adulty being able to cook your own food is a necessity!
Cooking doesn’t have to be complex or a 2-hr process.
Just by learning a few cooking basics, you can cook up meals for yourself that are healthier, more cost-effective, and just as delicious as restaurant food.
If you are in need of cookware, I would suggest investing some money in a cookware set, kitchen utensils, measuring cups and spoons, cutting boards, a chef knife, and a crockpot or an instant pot.
Some meals/food 20-year olds should know how to cook:
- Spaghetti
- Macaroni and cheese
- Grilled cheese
- Quesadillas
- Chicken salad
- Eggs
- Tacos
- Chili (in a crockpot)
- Oatmeal or overnight oats
6. Be able to prioritize
When you become an adult, your schedule can get pretty hectic and it can be hard to manage it all.
From going to school, working full-time, making time for friends and family, doing side hustles, and keeping your apartment or home maintained–it’s just too much for 24 hours in a day.
Related: How To Make Friends And Meet New People After School
As an adult, you need to know how to prioritize.
Prioritizing allows you to truly get what you want out of life and meet your short-term and long-term goals.
You can prioritize your life by dates/deadlines, by personal choice, or a combination of both (probably the best method!).
For example, if you are prioritizing your life based on dates or deadlines, whatever event or assignment is due the soonest will become your top priority.
If you are prioritizing your life based on personal preference, make a list of at least the top 5 things in your life that are most important to you. Such as:
- Spending time with family
- Having time for myself/self-care
- Having financial security
- Having a clean living space
- Being able to exercise
When you prioritize based on your personal preferences you can start making time for the things in your life that you want to focus on. As a result, you become more intentional about how you spend your time and who you spend your time with.
7. Being alone
One of the most surprising realities of adulthood is how much time you spend alone, especially after you have graduated from college.
Once you graduate college, many of your friends in college may move away for a brand new job, start having families of their own or get married, or you grow apart from your friends due to changes in priorities.
All of this is natural in life, but you have to be ok with the reduction in friends and interactions with others.
In other words, you need to be ok with being alone.
Being alone and learning how to be alone also means becoming your own best friend.
When you are your own best friend, being alone isn’t scary or boring. Being alone actually become a fulfilling experience because it also allows you to make time for activities or hobbies that would lead to self-improvement and self-discovery.
To work on becoming your own best friend, I would recommend finding one to two activities you enjoy doing by yourself.
For example, watching a guilty pleasure show on Netflix by yourself or working out by yourself.
Make it a priority in your life to do those one to two activities by yourself and then expand by doing more things solo like going shopping at the mall or grabbing lunch by yourself at Panera Bread.
I know it is strange doing the world alone and you may feel like the world is looking back and thinking, “why is she such a loner? Does she not have any friends?”
But in reality, no one cares. People care, honestly, more about themselves than you and how you go about your day to day life.
The more you become comfortable with being alone and being by yourself, you will soon find yourself becoming more confident in conquering the world on your own terms.
8. Send a professional email
Whether you need to send an email to a college professor, potential employer, or your current boss or manager, knowing how to write a professional email is definitely one of the many things 20-year olds should know how to do.
Writing a professional email can make the difference between getting what you want and not getting what you want.
If you send a poorly written email you could be seen as immature or impolite.
And that’s not the type of impression you want to be making!
Here a few things to take in consideration when writing a professional email:
Make sure your email address is appropriate
An email like cutiepie207@example.com is not as professional sounding as JaneDoe@example.com.
If you still have an old email address from your middle school or high school days that is not your name or an abbreviated version of your name I would go ahead and create a new email (they’re free to create) using a variation of your name.
For example:
- JaneMDoe@example.com
- JaneDoe@example.com
- JaneMaryDoe@example.com
Keep it short and simple
Have you ever heard of the KISS rule (keep it simple sweetie)?
The KISS rule is a must when writing a professional email. Whenever you send an email to a higher-up you want to make it very clear who you are and what you want.
Your professional email should be less than a paragraph and that’s being generous!
Also, even though your email is short, make sure you are still using correct grammar and punctuation.
If you are not a grammar guru, I would highly recommend using Grammarly (it’s free!) to help you draft up grammatically correct emails.
Grammarly is like a personal writing assistant. As you type, Grammarly will analyze what you are typing and make suggestions to make your writing better or help you correct grammatical errors.
Use a proper email subject with your name in it
It may sound weird to put your name in the email subject line, but trust me it’s useful.
When someone is scrolling through their email inbox (which may contain hundreds, if not thousands, of emails), if they come across a name they recognize they are more likely to respond back quickly.
It also makes you easier to identify versus an email address that could contain a jumble of letters and numbers.
Your email subject should also directly state what the purpose of the email is and what the reader can expect the email content to contain.
An example email subject line could be:
Jane Doe | Follow-Up Question from Today’s Meeting on August 22, 2020
Use a proper greeting and closing
When constructing a professional email you want to include a greeting line and a closing line just like if you were writing a physical letter.
For greetings you can use, “Dear Mr./Ms./Mrs./Dr.,” or if you are unsure who you are exactly emailing you can write, “To whom it may concern:”
For closings you can use: “Best regards” or “Sincerely” and then write your first and last name and any title or identifying information you have like on the next line.
For example:
Best regards,
Jane Doe
Marketing Director
Use neutral font size and coloring
When formatting a formal, professional email just keep all your formatting the default settings. There is no reason to make the text smaller or bigger or change the colors or the font of the text to make it look “pretty.”
In addition to writing a professional email, here are some other email tips and tricks that you should know by your 20s.
Compress large files
This goes for any email, professional or non-professional, but make sure you are compressing any email attachments before sending them out.
This will help get your emails to the receiver quickly and be less of a headache to download.
My favorite free website for compressing files (JPG, PNG, PDF, SVG, and GIF) is CompressJPEG.com.
Know the difference between CC and BCC
After the “To” line in an email drafting screen you will probably see the letters “CC” and “BCC.” Knowing how to appropriately utilize them is vital as an adult.
“CC” stands for carbon copy and “BCC” stands for blind carbon copy.
“CC” is used for copying someone on the email, but it is not directly for them to reply to. It is there to keep them in the know. Note that recipients in the “To” and “CC” line are seen by one another.
“BCC” is when you want to copy someone on the email but you do not want the person or people you are sending the email to to know that they got a copy of the email. In other words, the people in the “To” and “CC” lines cannot see if you BCC’d someone on an email.
While BCC is a powerful tool, do not use it for spreading rumors or secretly including someone in an email chain.
BCC should be used to private or hide other people’s emails when their privacy is of utmost concern, like sending an email to a large email list.
9. Organize the files on your computer
You have probably seen people with super messy, unorganized, and cluttered computer desktops.
With the world working and interacting more online it is important to create a system for organizing your computer files.
I tend to organize my files based on the main areas of my life like school, work, and personal. Then I create subfolders for each main area of my life and those subfolders will have subfolders and so forth!
Basically there is a never-ending chain of subfolders!
To keep the files on your computer organized you have to dedicate time to organizing your files.
It doesn’t have to be a long period of time but may take 5-10 minutes per day or every other day to sit down and organize your files.
And then maybe every few months sit down and do a good purge of the files you absolutely do not need anymore to clear up some disk space.
If you are like me and want to keep every document and every photo *just in case* then I would suggest purchasing an external hard drive like this one or investing in a yearly subscription to Dropbox, which is a cloud storage company.
I personally have used Dropbox for over 5 years and it has been a huge lifesaver!
I use DropBox to organize and store all of my computer files and I love how DropBox syncs between my personal desktop and phone, so I can access my files anywhere!
Dropbox gives you a generous 2 TB of data storage and they make it really seamless to store your files either on your computer or up in the cloud with their desktop application and mobile app.
10. Manage your text message and email inbox
Similar to keeping your computer files organized, it is important to also expand your digital organization to your text messages and email inbox.
You probably have or will accumulate a lot of text messages and email messages about various offers and deals at your favorite stores or have a backlog of old text messages and emails.
Just like your computer files, make it a habit to spend 5-10 minutes everyday or every other day cleaning up your text messages and emails.
You will save space on your phone and in your email inbox and feel a lot less overwhelmed too.
11. Protect your personal information online
As an adult you are now in charge of how much you share of yourself online. That comes with great responsibility, but also a degree of finally feeling in control of your life.
If you haven’t already, do a social media audit and make sure your social media privacy settings are the way you want them to be.
For example, on Facebook, do you want people to have access to information like your email address, phone number, or birthday?
Remember, a lot of security questions for other websites and applications require this type of information to unlock or authorize access to these accounts. Having that information public on Facebook may not be the best idea!
Also, be careful and cautious when taking quizzes on Facebook. While yes, finding out what kind of animal are you is intriguing and a good time passer, the answers you provide Facebook quizzes could be given to scammers or hackers, and thus, putting your various accounts online at risk.
And, think about Instagram–do you want your Instagram account to be public or private? Take a look at your Instagram profile description–do you have any information that would identify where you live or go to school? Take a moment to think about if you really want to keep that information out in the open.
Also, be sure to do a password audit for your most important accounts like your bank account, social media accounts, work or school accounts, and email accounts.
Are your passwords strong? Are all your passwords unique from one another? If not, I would highly suggest that you up your password-game by using a password generator and generating a unique, lengthy password for each account.
There are a ton of free password generators online like:
I personally use Dashlane’s password generator and password manager to store all of my passwords.
Dashlane makes it super seamless to store passwords and automatically log into my accounts online whether I am on a web browser or my mobile phone. Dashlane also offers a VPN with their premium plan which is $4.99/month or $59.99/year.
You can also get Dashlane for FREE.
With Dashlane’s free plan you can store 50 passwords on one device, autofill functionality while browsing the web, a 30-day trial of Dashlane premium, and a few extra features too.
If you are curious about Dashlane and how Dashlane can keep you more secure and help you work more efficiently online click here to learn more!
12. Make appointments
Whether it is a doctor’s appointment or haircut appointment, you should know how to make your own appointments by the time you are in your 20s.
However, I completely understand how difficult it can be to muster up the confidence and motivation to make appointments.
But being on the other side of it, meaning, when I was once a receptionist at an optometry office, we wanted and loved making appointments for patients!
Just be sure to have the appropriate materials before calling and making an appointment.
For example, if you are making a medical appointment (vision, eye, physical exam) you’ll need your:
- Medical insurance card
- Maybe your driver’s license
- Information about the primary insurance holder (i.e., their full name, date of birth, and last four digits of their social security number)
If you are anxious about making the initial phone call to make an appointment, most companies now provide an online appointment request form through their website.
However, just know that you may have to eventually talk on the phone, so the receptionist can gather more details about your upcoming appointment or find a better appointment time for you if the appointment time you originally requested is not available anymore.
13. Be flexible
As an adult, you never know what the world is going to throw at you. Learning how to be flexible in your life and schedule will help you remain positive even when things do not go as planned.
One way to be more flexible is to practice creating a time buffer between the actual deadline and when you actually get it done.
For example, let’s say you are starting a huge project at work on Monday and it is due on Friday by the end of work.
Instead of planning on getting it done on Friday minutes before the deadline, pretend that the deadline is actually on Thursday at the end of the workday, or even better, Wednesday at the end of the workday.
By setting personal or an artificial deadline before the actual due date you are building in a time buffer that allows you to be more flexible if the process of completing your project does not go as planned.
You never know when a certain software won’t work, a co-worker gets sick and you have to step in for them on top of your work, or maybe you get a flat tire and are late to work one day.
Another way to be more flexible is to just not set too high of expectations. I’m not saying to not have any expectations, but just don’t get so hung up on a situation if it does not turn out to be everything you wanted and more.
Expecting too much will only lead to frustration and disappointment, but expecting too little will also create a sense of “this is too good to be true.”
When you set realistic expectations, you are able to be more flexible and create a more neutral and fair judgment on how everything truly went.
14. Create a morning/evening routine
Being scattered brain in the morning and in the evenings after work can get pretty messy after a while.
Creating, implementing, and maintaining a morning and evening routine for yourself helps you accomplish the things that are most important to you in your life and kickstart the day ahead of you or prepare you for the next day.
A morning and evening routine should have some structure, but also the flexibility to allow you to do things that are outside of the normal routine, like:
- Going into the office early for a meeting
- Grabbing dinner at the last minute with friend
- Or maybe your dog had an accident overnight and you need to spend a few extra minutes that morning cleaning everything up – hey, life happens!
For your morning and evening routine, I would suggest picking 2-3 things you want to prioritize in your morning or evening routine.
For example, in your morning routine you really want to at least:
- Make and drink coffee
- Take a shower
- Eat breakfast
And as long as you get those 3 things done, you would say that your morning was a success!
After picking those 2-3 things, take action to get those things done every single morning until it just becomes a habit where you roll out of bed, take a shower, brew up your coffee, and eat breakfast. Make those three tasks so habitual that when you don’t do them you feel like your morning was incomplete.
When you create a morning (or evening) routine, you don’t have to second guess what you are going to do next.
You have a routine, you have structure and predictability! And you are less likely to lay in bed on your phone for 20 minutes after getting up too–unless that’s part of your morning routine, which is totally fine!
15. Make time to do laundry and the dishes
Doing the laundry and the dishes sounds pretty basic, right?
But as an adult, you soon find out that doing the laundry and the dishes is a NEVER ENDING cycle.
And when life gets busy, it can be hard to make time to do these two simple tasks that keep your kitchen clean and clean clothes on your back.
Related: How To Get In The Mood To Do Laundry
What I would suggest, is set aside just 5-minutes in the morning to do the dishes and or the laundry. Like seriously: set a timer for 5-minutes and see how much you can get done with either the laundry or the dishes.
You will be shocked about how much you can get done with either task! And you will feel so good and accomplished afterward!
If you want to take it another step further, if you use the Pomodoro Method, use one of those 10-15 minute break windows to do the dishes or the laundry. They are both a great mindless mental break while still being productive in some capacity.
If you are a time blocker, try blocking out 20-30 minutes on your schedule to do the laundry and the dishes everyday or at least every other day.
16. Save money while shopping
If you are paying full price for anything, you need to stop! There is no reason why you should ever have to pay full price for anything again!
Nowadays there are so many opportunities to save money while shopping.
From point systems that earn you gift cards, physical and digital couponing, and rebates–there are plenty of ways that you can save money shopping without putting in much effort.
Earning gift cards
There are multiple apps that will allow you to scan in receipts and earn points to redeem for gift cards and other rewards.
I personally like using Fetch Rewards because it is simple to use (literally take a photo and hit submit), I get my points awarded to me in literally under a minute, and there is the opportunity to earn bonus points for certain items that I already use and love.
I personally like redeeming my Fetch Rewards point for $3 Amazon gift cards that are worth 3500 points in the app.
If you use my referral link by clicking here and scan in your first receipt, you will earn 2000 points for literally scanning in a single receipt! Your first receipt can be as simple as a gas receipt or a receipt from your most recent grocery store run.
To learn more about Fetch Rewards you can click here, and also be sure to use my referral link–click here–once you are ready to take the leap to save money on by earning points on your everyday purchases!
Couponing
I personally have not tried physically couponing, but I am a huge fan of digital couponing.
Most major grocery stores, like Publix, Kroger, and Target, have a mobile app where you can make an account and “cut out” or save digital coupons to your account to use at your next purchase.
I personally love using the Target Circle app (it’s FREE) because I do all of my grocery store shopping at Target.
Target Circle has incredible deals, like $10 off your purchase of $50, earn $5-$10 gift cards for certain purchases, and 1% cashback on each purchase.
The 1% cashback can be used at a future purchase or you can accumulate the 1% cashback from several Target trips for a larger purchase down the road.
Usually, before I go on my bi-weekly grocery store runs, I will pull up the Target Circle app, view all of the Target Circle offers, and just start adding the offers I am interested in my Target wallet barcode that gets scanned at the checkout by the cashier.
Since using Target Circle I have saved almost $400!
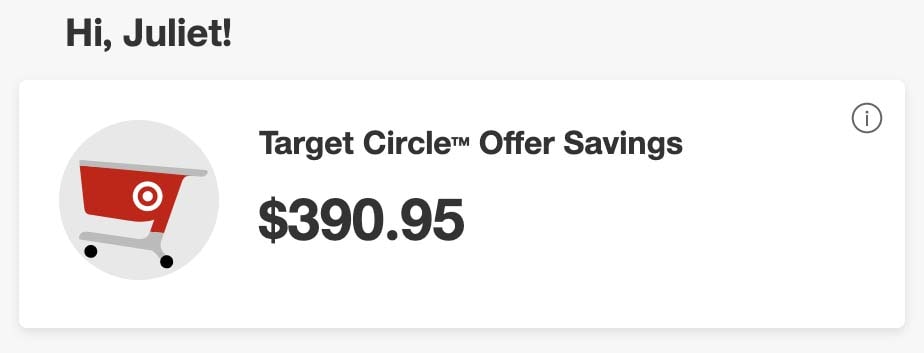
Even if you are a casual Target shopper, I would highly recommend downloading the Target Circle app and utilizing it to your advantage–I mean who doesn’t want to earn money for spending money?
I would also, again, recommend downloading the app for your favorite grocery store chain and making sure to save and use any digital coupon you are relatively interested in.
Here are some grocery store apps that may be of interest to you:
- BJ’s Wholesale mobile app
- Costco mobile app
- CVS mobile app
- Kroger mobile app
- Publix mobile app
- Target Circle mobile app
- Walgreens mobile app
- Walmart mobile app
Another way to get online coupons is to use the Honey Chrome extension.
The Honey Chrome extension (it’s FREE) will scour the internet for different coupon codes for the online retailer you are shopping at and then apply each coupon code one by one at checkout for you.
Once Honey runs through all the potential coupon codes, it will autofill the “coupon code” box with the coupon code that will save you the most money.
Rebates
Rebates are another way to earn money back on purchases you have made.
Essentially, rebates give you money back on purchases you have made either online or in-store.
Some of the most popular rebate companies are Rakuten and Ibotta, both of which offer online and in-store rebates.
Rakuten
Rakuten (used to be called EBates) is an online rebate service that provides cashback offers on a ton of recognizable stores and brands like Ulta Beauty, Adidas, Nike, Kate Spade, Tory Burch, American Eagle, and more.
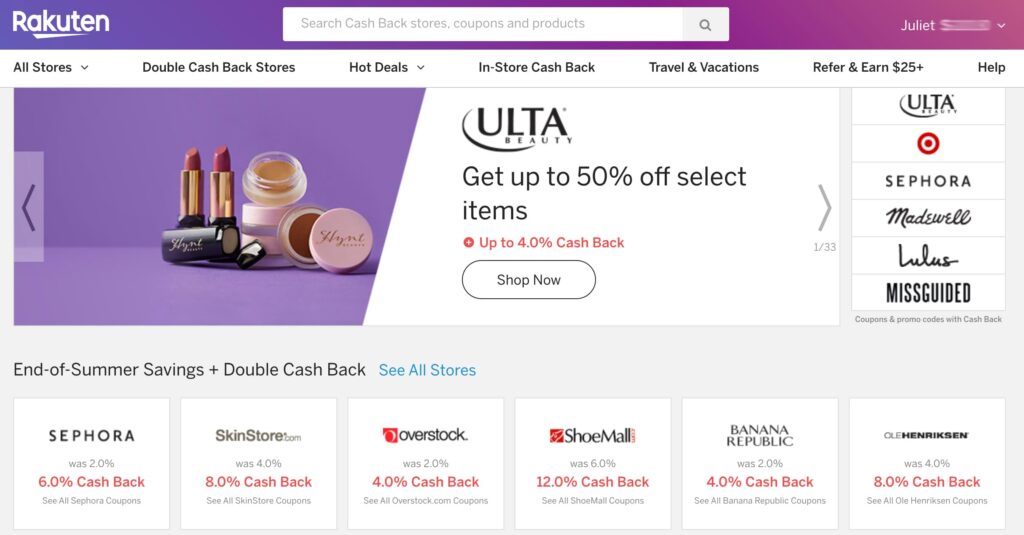
Rauten is definitely better for online purchases than in-person purchases due to its convenience.
If you want to use one of Rakuten’s online rebate offers all you have to do is:
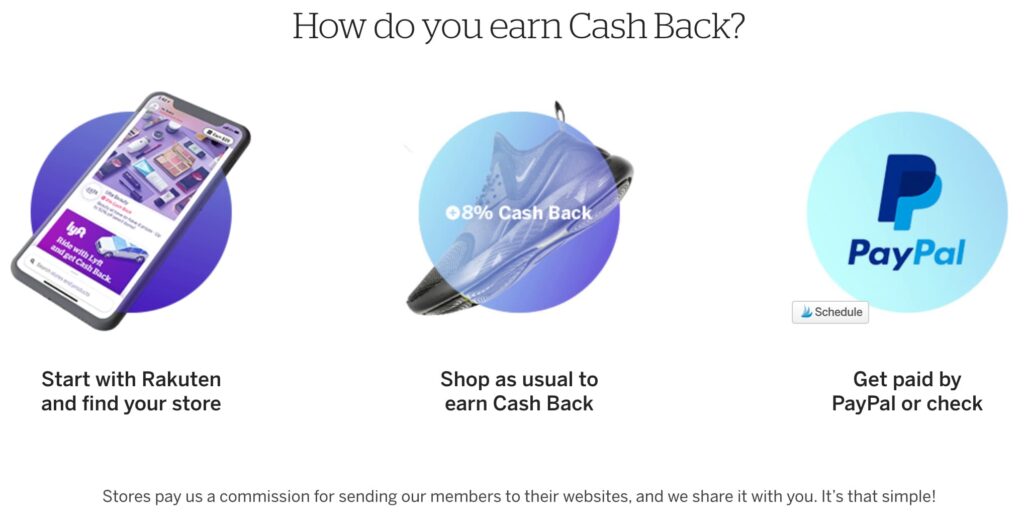
- Create an account with Rakuten or sign-up by connecting your Google, Facebook, or Apple account
- Select a store you are already planning on or wanting to make a purchase from
- Click “Shop Now”
Once you hit shop now you will be redirected to that store’s homepage and you will be able to shop as normal.
However, once you have checked out, you will receive cashback on your purchase!
The cashback rewards vary per store and change overtime.
For example, Rakuten is currently offering 10% cashback on your purchase from Ulta Beauty. However, the cashback percentage may decrease (or increase) in the future!
My suggestion is to watch the cashback percentages closely of your favorite stores and when it is high, go ahead and make your purchase to get the most bang for your buck!
Also, double-check with the Ibotta app or Honey to see if you can get a better cashback reward from them.
It doesn’t hurt to have multiple methods of saving money while shopping!
If you always want to be in the know of Rakuten’s cash back offers, you can download the Rakuten Chrome extension.
Whenever you go to your favorite retailer’s website, Rakuten will alert you about how much they are offering in cashback rewards.
If you want to use Rakuten in-store, you will need to select your rebate offers ahead of time, and make the purchase with the credit or debit card you link to Rakuten.
There’s definitely an extra step you need to take if you want to use Rakuten in-store, but it is definitely worth a little extra effort to get money back in your pocket.
When you sign-up for Rakuten you’ll get $10 after you make at least a $25 purchase using a Rakuten cashback offer, plus you get cashback on top of your $10, and who doesn’t love free money?! But remember, you gotta use my referral link to get this exclusive offer!
Ibotta
Ibotta is a mobile app that primarily offers rebates/cashback rewards on in-store purchases.
With Ibotta, you start by adding offers in the Ibotta app at the retailer you plan to make a purchase from and then you just go shopping!
After you go shopping you simply scan in your receipt to earn your cashback rewards.
Ibotta also allows you to link your Ibotta account to your loyalty accounts with popular retailers like Target, Rite Aid, and Walmart Grocery.
Linking your loyalty accounts makes it easy to earn cashback on qualifying purchases without having to scan in your receipt, however, you still have to go into the Ibotta app and add offers before making your purchase!
Ibotta also offers online rebates/cash back rewards at online retailers and food services like Amazon, Uber Eats, Grub Hub, Bed Bath and Beyond, and Ulta Beauty.
To redeem an online rebate you’ll need to go through the mobile app, select the retailer you plan on shopping with, and click “shop” to active the rebate, and then you will be redirected to the retailer’s website.
If you prefer to use your computer, instead of your phone, to make online purchases, Ibotta has a Chrome extension that allows you to activate rebate offers right from the browser extension.
If you are interested in using Ibotta to help you save money while shopping, you can click here to learn more and to sign-up. It’s free!
Knowing and implementing strategies to save money while shopping online and in-person is so vital! And it is certainly one of the many things you should know how to do by your 20s.
There are many applications and websites these days that make the process of saving money on your purchases seamless. I would highly recommend checking out all of the ones I mentioned in today’s blog post– Fetch, Honey, Rakuten, and Ibotta–and see what money-saving potential they can bring to you and your wallet.
17. Create a presentation with PowerPoint or Google Slides
For many jobs and endeavors, you experience in your 20s, you’ll probably need a PowerPoint or Google Slides presentation at one time or another.
Creating a presentation with PowerPoint or Google Slides that’s clear and makes an impact can make the difference in how you are perceived professionally.
Here are some pointers on how to create a slide presentation that will help you stand out and become a slide presentation master!
Keep the design minimalistic and simplistic
Remember in elementary school learning how to make a PowerPoint presentation and playing around with the different gradient backgrounds and Word Art? Yeah, those were definitely the good old days!!
However, in the adulting world, a rainbow gradient background and some Word Art is not going to cut it. And having all this “fancy” design can actually detract from the points you are making while presenting.
You want to create and design a PowerPoint or Google Slide presentation that is minimalistic and simplistic.


That means neutral colors like black and white. You can add one or two pops of colors if you’d like, but make them easy on the eyes like a pink or a yellow instead of a firetruck red.
But remember, at the end of the day, your PowerPoint or Google Slides presentation design is not what is going to win your audience over. It is your ability to present and convey your information in a confident and compelling manner. So if you are short on time, work on your presentation speech over your presentation design!
Make your presentation font size HUGE
When making a presentation, make sure to use a font size that everyone can read even if they were in the very back of the room.
I would recommend a font size of 32 pt or larger, but of course, the larger, the better! You don’t want someone at the very back of the room needing to squint to read your slides.
Use images that provide additional context and value
Images can be distracting, so use them sparingly and make sure they add an additional layer or value to your presentation rather than just for aesthetics or looks.
For example, if you are presenting on a complex topic, like stratified vs cluster sampling, find images that would help exemplify the concept and make it easier to understand.
Also, avoid–unless it really aligns with your presentation and provides value–GIFs or memes.
Use videos as needed, but cut to the chase
Video can be a great addition to your presentations if done correctly.
Again, as a presenter, you want to provide value to your audience and make it easy for them to take action afterward.
You do not want to add in a video link to a YouTube video that is 20 minutes long and takes at least 10 minutes to get to the topic you are presenting on.
Instead, either choose a video that’s short and concise or find the exact time the long video starts talking about your topic and start the video there.
You can even grab a video’s link on YouTube that starts the video at the exact time you want it to.
To do that, simply go to the video you want to add to your presentation, move the red slider on the video to the time you want the video to start at, click the “share” button in the bottom right under the video frame, and select the box that says, “Start at X:XX time.”
At the end of the day, your slide presentation is a written guide to your presentation that you are giving verbally.
Your presentation is not there to present for you. If it was, then I’d have Siri or Alexa just present in your place, so you can stay home and relax!
18. How to ask for what you want in Google Search
A lot of what you will find yourself doing in adulthood and in your 20s is Googling (or Pinteresting) how to do something.
From how to make crockpot chili, how to fill up your tires with air, and how to get a money order to pay your landlord, Google is literally your adulthood BFF.
As intelligent as Google is, it is very important that you know how to word or phrase your question in Google Search.
Knowing how to curate an accurate Google Search will help Google pull up the exact information you are looking for and you don’t have to spend time scrolling and clicking through a ton of search results.
Here are some quick and easy Google search hacks to help you get the results you are looking for in Google search results:
- Use quotation marks to bring up the exact phrase you are searching for
- Use the word “OR” (needs to be capitalized) to tell Google to find results that use either of the two words you are searching for (e.g., pink OR blue dorm room ideas)
- Use a minus “-” sign to tell Google not to include a certain word in the search results (e.g., “best dog breeds -kids” will not show any results that include the word “kids” so you won’t see a result like, “20 Best Dog Breeds for Kids”)
- Add the phrase “PDF:” or “PPT:” in front of your search term to find downloadable PDFs or slideshows/PowerPoint files of the information you are looking for–this is super helpful for college or graduate school students!
- You can use the Google search bar as a simple calculator by typing in mathematical symbols or phrases. For example, “20+15=” or “20 plus 15=” will result in the same search result of 35
- Access the Advanced Google Search page by clicking here for more options to customize your search results and get what you need answered
19. Write a hire-worthy resume and cover letter
90% of your adult life is going to be working.
Ok, that’s not a real statistic, and I sure hope that isn’t true, but sometimes it certainly feels like you are working 90% of the time!
Regardless, to get a bombdiggity job that sustains your lifestyle, keeps a roof over your head, and food in your belly you need to know how to create a hire-worthy resume and cover letter.
Writing a resume and cover letter that will get you hired is not as simple as slapping some words together on a Word document and submitting it through a job posting on Indeed.
Resume and cover letters are highly curated documents that demonstrate how and why you are the best fit for the company and the job position you are applying for.
For example, if you are applying for a job as a receptionist, you wouldn’t list out details about your job flipping burgers at McDonalds on your resume.
Instead, you would mention that during your time as a cook at McDonald’s, you demonstrated your ability to communicate with a wide variety of customers from different backgrounds and/or demonstrated your ability to problem-solve.
I’m definitely going to come out with a full blog post on how to write a hire-worthy resume and cover letter, but for now here are some quick tips on how to write a resume and cover letter.
Resume and cover letter tips:
- Keep your resume and cover letter to one page
- Use a legible font like Times New Roman or Arial, size 12 pt font, but no smaller than 10 pt font
- Do not include your photo–see why by clicking here.
- Make the information you include on your resume and cover letter specifically tailored to the job you are applying for–no generic phrasing!
- Use words from the job description in your resume, so if they are asking for a “bubbly” individual, use the word “bubbly” somewhere to describe you, but of course, don’t lie either if you aren’t a bubbly person.
Resume tips:
- Again, it is so important that you tailor all the information on your resume to the specific job you are applying for. Hiring managers KNOW the difference between a tailored and a generic “I just sent this to a 100 different companies, please hire me” resume.
- Don’t list your high school education–unless that is the highest level of education you have obtained
- Use bullet points to describe your previous jobs and keep those descriptions clear and concise–remember you only have a page for your resume!
Cover letter tips:
- Even if a job description is not requiring a cover letter, always submit a cover letter. It doesn’t hurt to go above and beyond when applying for a job. It will help you stand out!
- Once again–make it tailored to the job you are applying for. You want whomever is in charge of hiring for the company to recognize that you dedicated time to writing this cover letter JUST for this job
- This is your opportunity to further explain things on your resume that may not be 100% clear. Still keep it clear and concise because you only have a page!
- Also be sure to include words from the job description in your cover letter!
- Use examples from your work experience and life in your cover letter to demonstrate how you are able to fulfill the work requirements at the job you are applying for.
- Use a formal greeting and closing for your cover letter–click here to see a few wonderful examples.
20. Make extra money on the side/side hustle
Unfortunately, not every single part of adulthood is filled with wonderful experiences and abundance.
Sometimes money is tight especially when you are trying to pay off student loan debt, credit card debt, saving up to buy a new car or house, or an emergency happens.
When life gets rough having a 3 to 6-month emergency fund is crucial (you can read all about how to build an emergency fund by clicking here).
But if you do not have an emergency fund yet or your emergency fund is dwindling down, you need to know how to make extra money on the side.
(And by the way: even in good times, having a little extra cash coming in from a side hustle is not a bad idea!! In fact, your side hustle can even become a full-time job if you work hard enough!)
With the internet, mobile apps, and people’s desire to outsource mundane tasks like grocery shopping and dog walking, there are plenty of opportunities to start a side hustle online or in-person.
Some of the most common side hustles for 20-year-olds include UberEats/Uber Driver, DoorDash, walking dogs through Rover or Wag, and/or babysitting.
You can also make killer money selling clothes or items you don’t use on websites like Ebay, Poshmark, and Mercari.
Specifically for clothes, you can also take your gently used, trendy clothes to places like Buffalo Exchange, Plato’s Closet, or Uptown Cheapskate and get cash right on the spot for whatever they buy from you.
Other side hustles you could potentially start are:
- Tutoring (online or in-person)
- Music lessons (online or in-person)
- Grocery delivery through Shipt or Instacart (in-person)
- Creating an Etsy shop to sell handmade goods or digital goods
- Selling digital design products (like fonts, stock photos, templates) on Creative Market
- Virtual assistant for bloggers or creative entrepreneurs
- Work on Upwork or Fiverr
- Transcriber
- Amazon Mechanical Turk
- Freelance writer or graphic designer
- Starting a blog
- Starting a YouTube channel
- Writing on Medium
- Affiliate marketing
Some of the side hustles listed do take time to start up and make money from, like starting a blog or YouTube channel, but once they gain traction they can really start bringing in a nice side income!
Do you feel more prepared for adulthood?
There’s a lot of things you should know how to do by your 20s.
However, it can be difficult to decipher what is important to know how to do versus what can wait for another time.
In today’s blog post I shared with you 20 things you should know how to do by your 20s and provided you with a ton of tips and tricks to help you take action on each.
Related posts to things you should know how to do by your 20s
- 7 Things No One Told Me About Life After College
- 9 Crucial Steps To Take When Preparing for Post-Grad Life
If you found this blog post helpful, please share it with your 20-year-old friends by clicking on the Pinterest button down below. I’d truly appreciate it!